Showing posts with label Android Version. Show all posts
Showing posts with label Android Version. Show all posts
Wednesday, 16 May 2012
Alarm Clock Ultra For Android Phone: More Than An Alarm Clock
There are many Alarm Apps in the Google play
store but Alarm Clock Ultra for android
is unique app which is distinctive from the rest of the apps in the play Store.
The pleasing look and feel of the App adds an advantage in addition to the
effective and functional stuff. The App is designed in such a way that it can
cater to any need and wake you up with in a number of ways which will excite
you, no matter whether you are in deep sleep or having trouble in waking up. It
is the right means.
The app coded in a marvelous way that it can
solve the puzzles and math problems to Snooze or dismiss with different
degrees. This app offers number of widgets as compliment to your home screen
which will have certain functionalities even without actually going into app. Alarm
Clock Ultra has a Stopwatch which looks great.
The
Alarm Clock Ultra can be preset for different boiling times and Cooking
instructions with countdown timer and egg timer options. You can check out the
QR Code to download this excellent Alarm Clock Ultra App.
At
the end of this article we have given screen shots and video exclusive for our
readers.
If
you have questions regarding this app please feel free to write us in the comments
section.


02:31 0
Sunday, 13 May 2012
Steps to Root & Install Apps like Custom Recovery Image in Galaxy ACE PLUS S7500
Rooting an advice is essential for all Smartphone to install apps, it can be done very easily on Samsung Galaxy ACE PLUS S7500. for all those people who are not aware of the benefit of rooting .this article will certainly help you. Rooting access is required to install many apps, in addition to it, one can install many Firmwares in your Device. This article gives you detailed instructions on how to root and install apps like sutom recovery image.
No matter what all the current Firmware on which your Galaxy Ace Plus is on, with the given instruction in this article you can easily root your device. For explanation you will find the process of how to install custom recovery image in Galaxy ACE PLUS S7500
Disclaimer: We are not responsible for any damage happened to your device in the process of following the instructions steps mentioned in this article. It’s very unlikely that there will be any issues however we will try to help you at our best.
Essential Pre Requisites:
It is utmost essential to backed up all your data in your Samsung Galaxy ACE PLUS S7500. This article gives you instruction how to back up your data and if you are using your ACE PLUS on factory firmware then via KIES PC Suite you can take the Backup.
Steps to enable USB Debugging in your Galaxy Ace Plus S7500 from the path
“Settings > Applications > Development > USB debugging”.
Then check the USB Debugging option
To avoid interruptions disable all your antivirus suites on your device as well as on your computer,
Steps to Rooting
Note: In case the process of rooting get disturbed due to any issues then you simply need to remove Battery and re-insert back to restart the process.
No matter what all the current Firmware on which your Galaxy Ace Plus is on, with the given instruction in this article you can easily root your device. For explanation you will find the process of how to install custom recovery image in Galaxy ACE PLUS S7500
Disclaimer: We are not responsible for any damage happened to your device in the process of following the instructions steps mentioned in this article. It’s very unlikely that there will be any issues however we will try to help you at our best.
Essential Pre Requisites:
It is utmost essential to backed up all your data in your Samsung Galaxy ACE PLUS S7500. This article gives you instruction how to back up your data and if you are using your ACE PLUS on factory firmware then via KIES PC Suite you can take the Backup.
- Contacts > Sync with the Gmail application,
- Songs, Images, Files,Videos > Copy to internal / External SD Card,
- SMS > Use “SMS Backup & Restore app”,
- APN and MMS Settings > Note down from the path “Applications > Settings > Wireless and Network > Mobile Networks > Access Point Names”
- Call Log - Call Log and Restore
Steps to enable USB Debugging in your Galaxy Ace Plus S7500 from the path
“Settings > Applications > Development > USB debugging”.
Then check the USB Debugging option
To avoid interruptions disable all your antivirus suites on your device as well as on your computer,
Steps to Rooting
- Download Odin, Rooting Tar file and Root Me Zip package on your computer. Extract the Odin file and open the same in your device.
- Connect your ACE PLUS to the computer and place the Root Me Zip file in your phone’s SD Card. Ensure that you are not putting the device into the device or else it may spoil the device.
- Then, disconnect and turn off your Smartphone so that Galaxy Ace PLUS can be Moved into the recovery mode.
- Press Volume Up Key + OK button, and holding both simultaneously press the Power Button take you to the recovery mode. Just in case if the device starts normally, then you will have to again retry entering the recovery mode.
- In the next step, select “install zip from sd card” > choose zip from sd card and then choose the Root Me Zip Package which you have placed in the device.
- Once it is complete, select ++++ Go Back ++++ > reboot system now to reboot the phone. Now, one more time turn off the device so that it can be entered in the Download Mode.
- By pressing Volume down Key Center button the Download mode starts began in your ACE PLUS S7500 and holding both simultaneously press the Power Button after which a green robot will be shown indicating the Download Mode has been entered. In the next level, you need to press the Volume Up button as shown below to confirm the download mode.
- Once your phone is in the Download mode, connect the phone to the computer while keeping the Odin opened in your computer after which you will glance that the ID : COM section will turn Yellow.
- Install the USB Drivers in your computer &
- Go to the Path “Settings > Wireless & Network > USB Settings” and ensure that “Samsung KIES” option is ticked before connecting the phone to the computer.
- Now, click on “PDA” to select the file “Rooting Tar file” tar file and then click on “Start” in Odin to start the process of installing the recovery image.
- Once your done, then it will be taken to the home screen after which you can disconnect the device from computer.
Note: In case the process of rooting get disturbed due to any issues then you simply need to remove Battery and re-insert back to restart the process.
02:46 0
Friday, 11 May 2012
Ice Cream Sandwich 4.0 Upgrade OTA with Touchwiz - GT N7000 Galaxy Note
Android 4.0 Ice Cream Sandwich is one of the latest versions
of the Android platform for Samsung tablets, phones, and more. It influenced
more users for easy multitasking, resizable widgets, customizable home screens,
rich notifications, deep interactivity and adds powerful new means of
communicating and sharing.

After finishing the launch of Galaxy S III in April 2012 Samsung
now started working on Tablet + Phone Combination of Galaxy Note GT N7000, has
lastly been ported with the android upgrade of 4.0 Ice Cream sandwich. As we
all know that the user interface of the phone will be changed with the android
4.0 Ice Cream sandwich upgrade.

This update has been pushed out to all the Galaxy Note
owners internationally and this updated has been released via over the air. Few
European Countries were early to spot this upgrade and this upgrade comes with
XXLPY in-built software and the Android 4.0.3 IML74L OS version. You can also
update your Galaxy Note device through the official Samsung KIES Application.
This update introduces the mit touchwiz user Interface, they
named this upgrade as Premium Suite upgrade which comes along with various
suite upgrade to S Memo, S note App and other exclusive applications . The file
is of 318 MB and this upgrade is Digital Scrap booking tool which allow user to
solve the handwritten equations.
00:01 3
Tuesday, 8 May 2012
Steps to Extract RSS / Atom Feed of any Website on Android Browser
As you all know Web feeds are so essential specially so called users are News readers or the Feed Readers. In general the feeds have unique URL for each feed and this will allow users to know the new content on website periodically.
While browsing on the web, it’s very easy to find the feed or RSS URL of a site but it is tougher job when you are working on your phone
Steps to Install Extract RSS Feed & Know Feed URL

The Feed extractor Android application can be very easily downloaded to any of the Android Mobie phones and tablets. visit Android Apps Labs Page listing of Extract Feed Application and then click on install. Now this process completes the installation. No further steps required.
Now when you are browsing along you need to open the site and right click to find the RSS or feed URL.
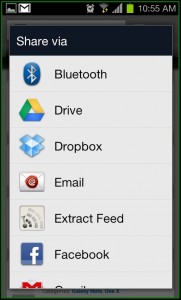
Finding it is very easy, simply tap on Share by selecting Menu and you will take you to the option of ‘Extract Feed’.
When you click/tap on it, you will automatically take you to the feed URL and this what you require.

How to Download Extract Feed Application
Extract Feed can be freely downloaded from Android Apps Labs. you need to visit the android Apps Labs Page of Extract Feed then click on install will directly download this application on to your Android Mobile Phone. Download will automatically proceed with installtion process.
In Addition, you can download Extract Feed using the QR code given below -

23:04 0
Subscribe to:
Posts (Atom)


